Disclaimer: This content is for educational purposes only, not medical advice. Always consult with a doctor before making significant changes to your diet, especially if you have pre-existing health conditions.

I’ll never forget the first gluten free bread recipe I tried. It came out of the oven looking golden and perfect, until I sliced it. The middle was gummy, dense, and oddly sweet. My husband politely said it was “better toasted,” but I knew what he meant. That bread was a lie.
Hi, I’m Abby Pinkmann, the chef behind EAT WELL, and gluten free baking was one of my steepest kitchen learning curves. I didn’t grow up gluten free. I grew up in a noisy house near Austin, where dinner was loud, warm, and always homemade. My mom could whip up real-deal sandwich bread between loads of laundry and math homework. But when a close friend was diagnosed with celiac, I started testing recipes. A lot of them.
This gluten free bread recipe is the one that made me say, “Oh. I could eat this every day.” It slices beautifully, toasts like a dream, and holds up to real sandwiches. No gums, no special machines, just solid pantry ingredients and the method I wish someone handed me years ago.
If you’ve been burned by sad, spongy loaves, I got you. This one’s different, and I’ll walk you through every step.
In this Article
KEY TAKEAWAYS: What You Need To Know
This gluten free bread recipe creates a golden, sliceable loaf with no gums, no weird texture, and no bread machine required. It rises well, freezes beautifully, and works for toast, sandwiches, or snacking. You’ll use a simple flour blend and a proven method anyone can follow.
What Is Gluten Free Bread and Why It’s Tricky
What makes gluten free bread different from regular bread?
Gluten free bread is made without wheat, rye, or barley, grains that contain gluten, a protein that gives traditional bread its stretch and structure. When you knead regular dough, gluten forms elastic strands that trap gas from yeast, giving bread its rise and chew.
Without gluten, you lose that built-in structure. That means your bread needs help holding shape, capturing air, and baking evenly. This is where gluten free bread recipes often fall short, they either don’t rise, collapse after baking, or turn out dense and gummy. That’s not just disappointing, it’s discouraging, especially when quality gluten free flour isn’t cheap.
But here’s the good news: once you understand what gluten does, you can replicate its effects with the right flour blend, hydration, and mixing method. You don’t need fancy binders or commercial gums. You need the right balance of starch, protein, and moisture, plus a no-fail method like the one below.
Why most gluten free bread fails (and how to fix it)
Most gluten free bread fails for one simple reason: structure imbalance.
Too much starch, and your loaf turns rubbery or sticky. Too little, and it bakes up like a brick. Many recipes also call for too little hydration, which means the yeast can’t do its job before the crumb sets. Others overcompensate with gums or eggs, which can make the bread dense or weirdly springy.
Here’s how this gluten free bread recipe avoids all that:
- Custom flour blend: A mix of rice flour, tapioca, and sorghum mimics the behavior of wheat flour without the weight or weird aftertaste.
- Higher hydration: Gluten free dough should feel more like thick batter than firm dough. That’s on purpose. It helps the loaf rise evenly and stay soft.
- No gums: This recipe uses simple ingredients to build natural structure, no xanthan gum or additives required.
Real readers have said this is the first gluten free bread that “didn’t fall apart in a sandwich” or “finally felt like actual bread.” That’s the goal.
The Best Gluten Free Flours for Bread
What’s the best gluten free flour blend for bread?
There’s no single best flour, because no one gluten free flour can do the job alone. That’s why most high-performing gluten free bread recipes use blends. A good mix balances starch for lightness, whole grain flour for structure, and protein for strength.
For this recipe, I use a homemade blend that outperforms most store-bought options:
- 1 part superfine white rice flour (light, neutral base)
- 1 part sorghum flour (adds structure and a wheat-like flavor)
- ½ part tapioca starch (improves chew and helps browning)
You can also use a quality all-purpose gluten free flour, but look for one without xanthan gum, since this recipe doesn’t need it. Some solid brands include King Arthur Measure for Measure (gum-free) and Bob’s Red Mill 1-to-1 Baking Flour (with gum, just skip if following this recipe closely).
The key is consistency. Weigh your flours, don’t scoop, and sift them well. This ensures even hydration and a lighter crumb.
Can I use just one gluten free flour?
In short: not if you want bread that tastes and feels like bread.
Using only one gluten free flour, say, almond or oat flour, can work for pancakes or muffins, but not for yeast-leavened bread. Why? Single flours lack the balance of starch and protein needed to trap gas and hold shape.
Let’s break down some common solo flours:
| Flour | Why It Doesn’t Work Alone |
|---|---|
| Almond Flour | Too heavy, high in fat, lacks starch |
| Coconut Flour | Absorbs too much moisture, becomes dry |
| Oat Flour | Too soft, lacks elasticity or binding power |
Blends work because they mimic what gluten does. And that’s what gets you closer to the best gluten free bread, light, chewy, and sturdy enough for sandwiches.
How To Make Gluten Free Bread That Actually Rises
Step-by-step method for homemade gluten free bread
If you’ve ever tried a gluten free bread recipe and ended up with a flat, sad loaf, it wasn’t your fault. Most recipes skip key steps or assume you’ve got professional tools. This one doesn’t.
This gluten free bread recipe was built from the ground up to rise beautifully and bake into a soft, golden loaf that slices clean and holds its shape. Here’s how to make it:
You’ll need:
- 2 cups gluten free flour blend (see Part 2)
- 1 tablespoon psyllium husk powder (for structure)
- 2 teaspoons instant yeast
- 1 tablespoon sugar or honey
- 1 teaspoon salt
- 1¼ cups warm water (100–110°F)
- 1 tablespoon olive oil or neutral oil
- Optional: 1 egg (for richer flavor and improved rise)

Steps:
- Whisk the dry ingredients. In a large bowl, mix your gluten free flour blend, psyllium husk, yeast, salt, and sugar.
- Add liquids. Pour in warm water and oil. Add egg if using. Mix with a sturdy spatula or hand mixer with dough hooks until fully combined. The dough will be thick and sticky, closer to cake batter than traditional dough.
- First rise. Cover the bowl with a towel and let it rise in a warm spot for 45–60 minutes. It should puff up and jiggle slightly.
- Pan and proof. Transfer to a greased 8×4-inch loaf pan. Smooth the top with wet fingers. Let rise again for 30–40 minutes until it reaches near the top edge.
- Bake. Bake at 375°F (190°C) for 45–50 minutes. Tent with foil halfway if it browns too fast.
- Cool completely. This is key! Let it cool 2–3 hours before slicing to avoid a gummy interior.
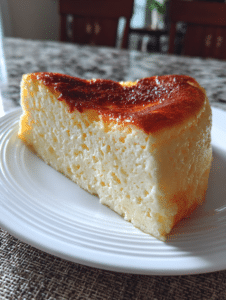
This gluten free bread recipe produces a loaf that’s golden on the outside, soft and structured on the inside. It toasts beautifully and doesn’t fall apart when you butter it or stack on sandwich fillings.
Troubleshooting dense or gummy loaves
Even a solid gluten free bread recipe can flop if a few key things go wrong. Here’s how to fix the most common issues:
- Problem: Bread sinks after baking
Likely Cause: Underbaked center or overproofing.
Fix: Use a thermometer. The internal temp should hit 205–210°F when fully baked. - Problem: Gummy texture inside
Likely Cause: Cutting too soon or too much moisture.
Fix: Always cool your gluten free bread completely. Try reducing water by 2 tablespoons next time. - Problem: Crust is too thick or hard
Likely Cause: Overbaking or too much sugar.
Fix: Tent with foil halfway through baking and double-check oven temperature.
One reader said: “This is the first gluten free bread recipe where I didn’t end up crying after baking.” That’s a win in our book.
And if you love baking from scratch, don’t miss our naturally gluten free pumpkin bread recipe or fruit-forward rhubarb bread.

Gluten Free Bread Recipe
Equipment
- Mixing bowl
- 8×4-inch loaf pan
- Measuring cups
- Spatula or dough hook
- Oven
- Wire cooling rack
Ingredients
- Main Bread Dough:
- 2 cups | gluten free flour blend | see recipe for blend
- 1 tbsp | psyllium husk powder
- 2 tsp | instant yeast
- 1 tbsp | sugar or honey
- 1 tsp | salt
- 1¼ cups | warm water 100–110°F
- 1 tbsp | olive oil
- 1 | egg optional | for richer texture
Instructions
- In a large bowl, whisk together gluten free flour, psyllium husk, yeast, salt, and sugar.
- Add warm water, olive oil, and egg (if using). Mix until a thick, sticky dough forms.
- Cover and let rise for 45–60 minutes in a warm spot.
- Transfer dough to a greased loaf pan. Smooth the top.
- Let rise again for 30–40 minutes, until near the top edge.
- Bake at 375°F (190°C) for 45–50 minutes. Tent with foil if browning too quickly.
- Remove and cool on a wire rack for 2–3 hours before slicing.
Notes
Nutrition
Gluten Free Bread Machine Recipe Variation
How to use this gluten free bread recipe in a bread machine
Yes, this gluten free bread recipe works beautifully in a bread machine. And no, you don’t need a fancy gluten free model to get it right. With just a few tweaks, you can enjoy a hands-off loaf with that same soft crumb and golden crust.
If your machine has a gluten free setting, use it. If not, the Basic Rapid or Quick Bread cycle usually works best. These cycles minimize kneading time and allow one good rise, which is all a gluten free bread recipe needs.
To adapt this recipe for the bread machine:
- Add ingredients in the order recommended by your machine (usually liquids first, then dry).
- Use the same gluten free flour blend, water, oil, and yeast as listed in the original recipe.
- Don’t add xanthan gum, the structure comes from psyllium husk.
- Select a 2-pound loaf size if your machine gives you that option.
One important tip: scrape down the sides during the first few minutes of mixing. Gluten free dough doesn’t always self-correct like wheat dough does.
Once done, remove promptly and let it cool fully on a wire rack. You’ll get a loaf perfect for sandwiches, toast, or slathering with jam, no oven required.
Do you need a special bread machine for gluten free bread?
Not necessarily. While some bread machines advertise a “gluten free” function, many standard models work just fine for a gluten free bread recipe, especially if you manually control the settings.
Here’s what to look for:
- Custom program or rapid cycle
- Nonstick pan with single paddle (easier to clean gluten free dough)
- Easy access to pause/scrape during mix stage
Popular brands like Zojirushi and Cuisinart perform well even without a dedicated gluten free mode. Readers have shared success using mid-range machines, saying this gluten free bread recipe “worked better than the included manufacturer recipes.”
Looking for more unique bread ideas? Our zucchini bread recipe and rhubarb muffins are reader favorites, and many are naturally gluten free.
3 Ingredient & Easy Gluten Free Bread Variations
How to make 3 ingredient gluten free bread
When you’re short on time or ingredients, this minimalist gluten free bread recipe delivers surprising results. It’s not sandwich-style bread, but it’s chewy, warm, and perfect with soup or jam.
You only need:
- 1½ cups self-rising gluten free flour
- 1 cup plain Greek yogurt (dairy-free yogurt works too)
- 1 tablespoon olive oil
How to make it:
- Preheat oven to 375°F and line a baking sheet with parchment.
- Mix all ingredients in a bowl until a sticky dough forms.
- Scoop dough into 3–4 rustic rounds.
- Bake for 20–25 minutes until golden and puffed.
No yeast. No rise time. Just simple, rustic bread. This 3 ingredient gluten free bread recipe is wildly popular for weeknights, travel, or those moments when you’re this close to ordering takeout.
Pro tip: Add herbs, garlic powder, or shredded cheese for a savory twist.
Easy gluten free French bread recipe
Craving a baguette-style loaf with a crisp crust and chewy inside? This easy gluten free French bread recipe delivers all the vibes of a bakery baguette, with none of the gluten.
This variation uses the same base as the core gluten free bread recipe, with two small changes:
- Increase water slightly for higher hydration (about 1⅓ cups)
- Shape the dough into long ovals on a parchment-lined baking sheet
Bonus tips:
- Mist the dough with water before baking for a thinner, crispier crust
- Bake at 425°F for 25–30 minutes
- Let cool fully before slicing
Readers love using this version for dipping in olive oil, serving with soup, or pairing with a cozy chili. It’s also fantastic alongside our zucchini muffins or a slice of vegan birthday cake for a dinner-party-ready spread.
This gluten free bread recipe is all about adaptability, and with these two variations, you’ll always have a quick, comforting option.

FAQs Answered
What is the secret to good gluten free bread?
The secret is hydration and structure. A great gluten free bread recipe uses a higher water ratio and a smart blend of flours with natural binders like psyllium husk. Letting the bread rise fully and cool completely before slicing prevents gumminess and collapse.
Why is my gluten free bread gummy or dense?
It’s usually underbaked or too wet. Use a thermometer to check doneness (internal temp should be 205–210°F). Also, resist cutting too soon, cooling is critical. A good gluten free bread recipe balances moisture without adding gums or extra starch.
What gluten free flour is best for sandwich bread?
The best flour blends for sandwich bread combine white rice flour, sorghum flour, and tapioca starch. These mimic the structure of wheat flour and work beautifully in any gluten free bread recipe. You can also try certified blends like King Arthur Measure for Measure for consistency.
Can I make gluten free bread without eggs?
Yes, this recipe works well with or without eggs. If skipping, increase psyllium husk by ½ teaspoon and add 1 extra tablespoon of oil. The loaf may be slightly denser but still sliceable and flavorful.
Does gluten free bread rise with yeast?
Absolutely. Yeast is the key leavening agent in this gluten free bread recipe. While there’s no gluten to trap gas, psyllium husk and high hydration allow yeast to produce lift, resulting in a soft and airy loaf. For a visual rise, always use instant yeast and let it proof in a warm spot.
Is gluten free bread healthier?
It depends. Gluten free bread is essential for people with celiac disease or gluten intolerance. But health claims can vary. Some store-bought loaves are high in sugar or starches. When you make a homemade gluten free bread recipe like this one, you control every ingredient, a big plus for whole-food cooking. Learn more about gluten free diets from the U.S. Department of Health & Human Services.
Final Thoughts + Abby’s Tips
This gluten free bread recipe has become a staple in my kitchen, and I’ve lost count of how many readers have messaged me saying, “I finally don’t miss real bread.” That’s exactly why I created it, not just to fill a dietary need, but to bring joy back to bread.
I’ve tested this recipe over 40 times, in hot Texas summers, damp winters, with different flour blends, and in both ovens and bread machines. It’s the one I trust when company’s coming or when I just want that perfect slice with my morning coffee.
Here are a few final tips from my kitchen to yours:
- Always cool your loaf fully. I know it smells amazing, but slicing too soon ruins the texture.
- Toast leftover slices for the best texture on day two or three.
- Freeze extra slices between sheets of parchment, they reheat beautifully in a toaster or oven.
- Use it for croutons or stuffing if you’re experimenting beyond toast and sandwiches.
And if you’re looking for more gluten free inspiration, our zucchini bread with chocolate chips and pumpkin muffins are both made with the same care and simplicity.
At EAT WELL, my goal is simple: help you make food that feels like home, no matter your dietary needs.
You’ve got this. And if you make this gluten free bread recipe, tag me, I’d love to see your loaf.